Congratulations on acquiring your new Duro! This guide is intended to walk you through setting up your new Duro and the different ways you can interface with the Duro.
Required Accessories
This article assumes that you have the necessary cabling which is provided in the Duro Interial Starter Kit.
Below is a list of required accessories to interface with your Duro:
- Power Supply
- Ethernet Cable OR 17-Pin AUX Cable with a RS-232 | USB to DB9 Aux I/O Cable
- Calian GNSS LTD Antenna or other GNSS capable antenna
The Duro has a TNC antenna connector. Adapter's are available for antenna's that have other connector types such as SMA.
Cable Connections
The Duro has five unique ports, one for power, three for data transmissions and one for the GNSS antenna. Below is a illustrated picture with a list of the cables mapped to each port.

Cable Mappings
You can find the complete pinout or each connector in the Duro User Manual
Interfacing With Duro
The primary data protocol the Duro uses to communicate is the Swift Binary Protocol. The sbp protocol was designed by Swift Navigation and meant to be a fast, light weight protocol for communication navigation data along with system info and device settings.
We will go over two ways to communicate with your Duro. The first way being the Swift Console which is a graphical user interface developed to show the full features of the Duro and a simple Python script highlighting one of the many programming languages that libsbp supports.
Before we go any further please checkout the USB drivers article in order to use the USB/RS232 cable to connect to the Duro.
If you are using the Ethernet port to connect directly to you computer then you'll need to set the IP address of your computer to the same subnet as the Duro. The default IP/gateway address for the Duro is 192.168.0.222/192.168.0.1. Setting your computers' IP address to the default gateway address will allow your computer to directly connect to the Duro over ethernet.
Swift Console
Now lets look at using the Swift Console as a means to interface with our Duro as well as configure the Duro for your application. Here we will go over how to connect to your Duro over both the AUX and Ethernet connections and note out some important configurable settings.
The Swift Console is supported on Linux, Windows and MacOS. Please refer to this installation article for platform specific instructions. More detail about the Swift Console can be found in the Swift Console User Manual.
Opening up the Swift Console application, you'll have two choices for connecting to your Duro. Either choose Serial/USB for the AUX/Serial connection or TCP/IP if using the Ethernet port.
TCP/IP - Ethernet

Serial/USB - AUX
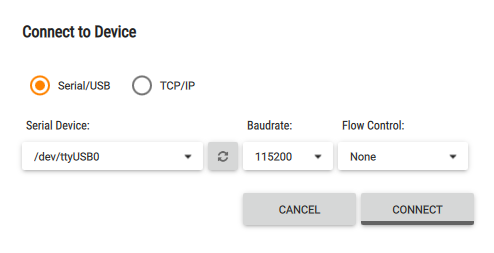
The Serial Device field shown in the snip above is unique to Linux based computers. Please note that the list of serial devices will have different naming conventions across different platforms.
Once connected to your Duro, look around the console. You'll find the interface is a good tool for visualizing GNSS data and general information about your Duro. For more information about the Swift Console and the different tabs please refer to the Swift Console User Manual.
Settings Tab
One of the more useful tabs in the interface is the Settings tab. This window lets you configure the Duro to match the requirements of your applications such as network/IP address of the Duro, GNSS specific configurations and configuration of what information gets passed into the data ports (Ethernet, AUX, Serial). Each setting should have a
Configuring Data Modes
For each data port, you may change the mode to the following:
SBP - configures the interface to transmit messages specified in the 'enabled_sbp_messages' setting and to receive incoming SBP messages. If the mode is changed from SBP the console will no longer be able to communicate over the interface.
NMEA OUT - configures the interface to transmit the GGA, RMC, GLL, VTG, ZDA, GSA, and GSV NMEA 0183 messages. The interface will not receive incoming messages.
RTCMv3 IN - configures the interface to receive RTK corrections in RTCMv3 format. The interface will receive 1002, 1004, 1005, 1006, 1010, 1012, 1033, 1230 and MSM4-7 RTCMv3 messages and will not transmit or receive any other messages.
RTCMv3 OUT - configures the interface to transmit RTCMv3 messages.
The Duro has six data interfaces that support the modes mentioned above. Those interfaces are named uart0, uart1, tcp server0, tcp server1, udp server0, udp server1.

[tcp server0, tcp server1 snip]

[uart0, uart1 snip]

[udp server0, udp server 1 snip]
The Swift Console is your easiest avenue for exploit the configuration and features of your Duro. From here, we suggest looking through the Swift Console User Manual for a complete description about the console's features.
Was this article helpful?
That’s Great!
Thank you for your feedback
Sorry! We couldn't be helpful
Thank you for your feedback
Feedback sent
We appreciate your effort and will try to fix the article